Contents
- Adding New Page
- Customizing Your New Page
- Creating New Blocks
- Custom Code Block
- POS Menu Functionality
- Functionality
- Showing/Hiding in dashboard
- Adding/Removing from menu
Adding New Page
To add a new page to your POS you do the following:
- Go to POS Templates found under the storessalespersons section.
- Select your template.
- Select create page on the right.
- When creating you have the following fields:
- Name -> The name of your page
- Layout -> The layout that it follows. (Blank is a blank page, Masterpos includes the header menu at the top and the collapsing side menu)
- Title -> The title of the page
- Meta Title -> Title used for meta data and in the tab
- Meta Description -> Description used in page meta data
- Meta Keywords -> Keywords used in page meta data.
- URL -> The url of the page. (Please note all POS pages must start with /pos/ and then the url of your choosing. I.E. /pos/products
- When saving it will appear in the pages table within your template.
Customizing Your New Page
After creating your page, you can customize it using various blocks and components available in the page builder. To open page builder simply press the blue button next to the page you wish to view and it will load the view with all the blocks.
Creating New Blocks
To create new blocks you must add a folder in the following location: public\theme\defaultpos\blocks. This folder must contain 2 files:
- Config.php: This is the config file that contains a blocks name, category and settings if you want to add any
- view.php: This is the display that the user sees when the block is dragged in. Placing partials for files in the view or livewire folder works here but you cannot place blade functionality
- (Optional) thumb.png: This is the thumbnail that appears in the pagebuilder menu for this specific block.
Custom Code Block
Pos template contains a custom code block that can be used for calling controllers and receiving views directly.
In page builder they are called "GeneralBlock".
When you drag one in you will see these settings:
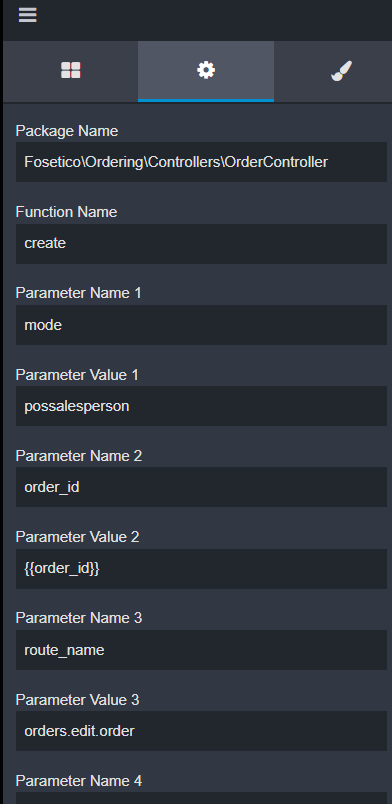
"Package Name" is the name of the package that contains your controller.
"Function Name" is the name of the function.
Any extra parameters will be passed into the function as Request $request.
For example in my screenshot we pass $request = ["mode" => "possalesperson", "order_id => "{{order_id}}", "route_name" => "orders.edit.order"
If you use {{}} it will take this value from the url. I.e. if your url is localhost::8000//examplefunction?order_id=123 then it will pass order_id => 123 in the function
POS Menu Functionality
Functionality:
The menu in POS is generated dynamically from the menu items table and manipulated from the Pos Menu Items table. Here we can add, remove, show and hide menu items.
Showing/Hiding In The Dashboard:
- Go to Pos Menu Items
- Click edit on a menu item
- Uncheck the display on dashboard settings and save.
Adding/Removing From Menu
- Go to Pos menu items
- Click Create pos menu item
- Fill in the details
- Name = The name that appears in the menu
- Icon = The icon that appears next to the item and in the dashboard (Add text that belongs to a favicon i.e. user)
- Colour = The colour of the badge when it displays in the dashboard
- Url = The Url it redirects to when pressed. (Remember all pos links must start with /pos/)
- Display On Dashboard = State whether or not you want it to display in the dashboard. If deactivated it will still appear on the side menu.
- Press create.